Assembly instructions
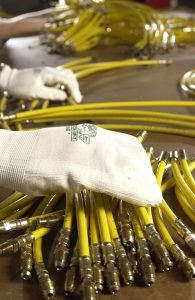
FREN TUBO BRAKE HOSES
1 – Before removing the original hoses, check that the new hoses fit perfectly.
2 – Clean the couplings of the original hoses and remove them. Comply with all safety measures required for brake fluids!
3 – Install the new hoses without stretching them too taut or let them rub against other components. Use pre-existing vehicle support structures whenever possible and do not allow less than 40mm bends, even when suspension stroke is complete.
4 – Apply the new fittings included in the package to the hoses. Use either original socket-head screws if they are in perfect condition. Torque for aluminium socket-head screws should not exceed 15/17 Nm and 20/22 Nm for steel screws.
5 – Check for any rubbing or tension points in the hoses, using full suspension stroke and steering. Install the hoses using the harness strips included in the package, if required.
6 – Adjust the rubber bushes, if present, to guarantee smooth operation.
7 – Bleed the braking system according to vehicle manufacturer instructions. Use new brake fluid only, as prescribed by manufacturer, from an unopened container.
8 – Check for any leaks in the braking system and clean away any squirts of brake fluid.
WARNING: expect vehicle brakes to work differently! Drive carefully, to gradually get used to the new pressure point.
Repairing of or tampering with the hoses will invalidate the warranty. The manufacturer accepts no liability for damages caused by incorrect installation or by instructions which are non-applicable to special models.
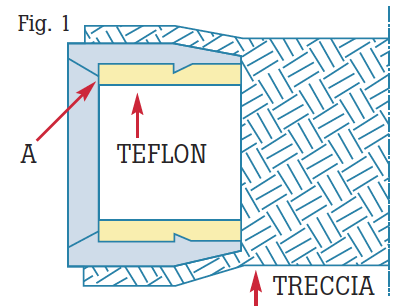
FREN TUBO RECOVERABLE CONNECTORS
1 – Use the pliers PT010 for cutting the hose of I.D. 1/8” or the tube cutter UTO14. Otherwise use a fine-toothed hacksaw taking care to wrap the tube with tape at the cutting point. Insert the 2 assembly nuts on the tube.
2 – Revive the circumference of the hole of the tube by means of tool UTO12.
3 – Push the METAL CONE up to the end A (see fig. 1).
4 – Lubricate the threads.
5 – Establish the exact position before tightening (making a reference mark).
6 – Tighten to 0.8 Kg (8 Nm).
7 – Alternately tighten the two threads a quarter turn at a time until reaching the exact position. DO NOT exceed 10 Nm with aluminium alloy connectors and 15 Nm with steel connectors.
8 – Important: carry out testing after assembly.
FREN TUBO SYSTEM WITH ADAPTERS FOR BRAKES
 1 – Fix the adapter in the right position.
2 – Lubricate the nut thread and tighten the nut on the adapter. DO NOT interpose seals!
TIGHTENING TORQUE
STEEL FITTINGS: 15 Nm
ALUMINIUM ALLOY FITTINGS: 10 Nm
FREN TUBO SYSTEM WITH ADAPTERS FOR RADIATORS
1 – Lubricate the threads (adhesive grease LU001).
2 – Fix the adapter in the right position.
3 – Tighten the nut on the adapter, do not interpose seals!
TIGHTENING TORQUE
STEEL FITTINGS: 15 Nm
ALUMINIUM ALLOY FITTINGS: 10 Nm
FREN TUBO RADIATOR LINES RE-USABLE SYSTEM
1 – Use the UT014 tube cutter to cut the 3/8” I.D. tube. If the above tool is not available, use a fine tooth saw, and wrap tape around the tube where it is to be cut. Insert the 2 assembly nuts into the tube.
2 – Restore the circumference of the tube I.D. using tool UT013.
3 – Push the nipple up to the end A (see figure 1).
4 – Lubricate the threads.
5 – Fit the terminal before moving the nut up and tightening (steel 15 Nm, aluminium alloy 10 Nm).
6 – Important: check after assembly!